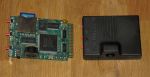
May 24, 2015
I mentioned about C64 Reloaded in my previous post. Let’s talk a bit more about it.

Because here it is!
The C64 Reloaded is a new C64 motherboard. It is recreated according to the schematics of C64B3 model, ASSY NO 250466, and is designed to use the original C64 chipset. A good description you’ll find on the announcement on Individual Computers’ website. Basically, it’s a real Commodore 64, only manufactured with today’s standards.
I haven’t had enough time to spend with this machine to call this a review yet. Instead I’ll share a pictorial overview of the board and some of the nice details on it. Read the rest of this entry »
 28 Comments |
  C64 Hardware, Commodore 64 | Tagged: 8-bit computing, C64, C64 hardware, C64 Reloaded, retrocomputing |
  Permalink
 Posted by ilesj
September 22, 2013

My retro enthusiasm is not limited to C64, or Commodore alone – not at all.
Recently I put together an old PC. In fact, everything started when I grew interested in MIDI music. Or to be more precise, how different consumer sound cards render the music. I found it fascinating how MIDI compositions can sound very different using different sound cards and sound patches. Especially when it comes to previously familiar game musics. Many have felt the same, and there are various sites on the net where you can listen and compare game musics recorded from different sound cards.
Inspirited from all that I bought myself a NEC XR385 from eBay. Basically it’s an OEM Yamaha DB60XG MIDI daughter card. These seemed to be regularly available from a Chinese seller, and didn’t cost that much. Bought mine in early spring, but it ended up taking almost four months until I actually got my card, but that’s another story. By now the supply from the Chinese seller seems to have been depleted, sadly.

The NEC XR385 MIDI daughter card
When I finally got the card, I had to put together a setup around it. The card cannot be used alone as such, as it is designed to be plugged into a special wavetable a.k.a. Wave Blaster interface found in many 90s and later sound cards. Another option to use the card would be to convert it to an external MIDI sound module. Read the rest of this entry »
6 Comments | Other Retro Hardware, Projects | Tagged: DOS, MIDI, multiboot, retro-PC, retrocomputing, sound cards, Windows 9x, Yamaha XG | Permalink
Posted by ilesj
April 13, 2013

It’s been already quite a while since I last wrote anything about 1541 Ultimate. In the meantime I’ve gotten myself also the new model, the 1541 Ultimate-II. It’s a good time to recap the project and device status at the moment, especially since the latest firmware update brought some nice new features.
So what’s different from the previous model?
Let’s start with the physical differences.

Obviously the appearance has changed a lot. The most apparent change is that this new model comes in a case, and is more compact. Now it actually looks like a cartridge, and it doesn’t have those silly legs the previous model was standing on. And yes, having the case on it is a definite plus.
The smaller size comes with a downside though. The SD card slot is replaced by a microSD card one. Regular size SD cards are much nicer to handle I think. But it’s not only that! Since the first few production batches the microSD card slot part had to be changed due to sourcing issues. Mine is with the new slot, and I must admit, the new microSD slot is a bitch. With this new card slot, the microSD card goes deeper inside the cartridge. You need to have something thin to insert or eject the card. You just can’t do it with the tip of your finger. Read the rest of this entry »
5 Comments | C64 Hardware, Commodore 64 | Tagged: 1541 Ultimate, C64, C64 cartridges, C64 KERNAL, retrocomputing, SID emulation | Permalink
Posted by ilesj
February 16, 2012
At the end of last year skoe released the EasyFlash 3 design. Just like the original EasyFlash, the design is open source, so basically anyone is able to start making those. It’s likely that these boards start surfacing from different sources. The first place selling assembled EasyFlash 3 cartridges I found was Retro-Donald’s Sinchai-Shop, and mine’s from there.
 There are already at least two board designs. One like mine here, a short cartridge with buttons on both sides. The other design has longer board and the buttons are at the back in the usual way.
You North-American folks are probably pleased to know that RETRO Innovations is going to manufacture and sell them as well.
And yes – this is your JiffyDOS on a stick .. err.. cart solution!
Seriously, calling EasyFlash 3 just that is a vile devaluation (and I’ve seen it already happen). It’s much more than “just” a KERNAL on a cartridge. Read the rest of this entry »
21 Comments | C64 Hardware, Commodore 64 | Tagged: Action Replay, C64 cartridges, C64 KERNAL, Commodore 64, EasyFlash, JiffyDOS, Nordic Power, Retro Replay, retrocomputing, Super Snapshot | Permalink
Posted by ilesj
February 4, 2012

You know the classic Suncom’s Totally Accurate Controller MK2, right? Better known simply as the TAC-2. The favourite Atari-standard joystick of countless people, with the reputation of being indestructible. Other than durable, it’s also a very good game controller. The design is simple, you can hold it in your hand very comfortably, no matter if you’re left or right-handed. And the feel and tactile response is top-notch.
While not completely fail-proof, at least TAC-2 withstood abuse much better than most other joysticks that were commonly used with Commodore 8-bits, Amigas and Atari computers. Both the durability and usability are result of very, very simple yet functional design.
I mean, have you ever looked inside of that controller? It appears that there isn’t anything that could ever fail.
Here’s a picture of TAC-2 dismantled. You can completely take the stick apart and put it back together without using any other tools than a screwdriver, which is needed for the three screws that hold the case together.

The buttons and directional switches are nothing but robust construction where metal part presses against another when you press a button or the stick into some direction. In its simplicity it’s ingenious.
But in fact there are some common issues with TAC-2. The buttons tend to become unresponsive over time. As with any switch, metal oxidation is the main reason. Or plain dirt. Eventually this may happen with the directional stick too. But in fact, you could try to rub the contact surfaces clean to make better contact without even opening up the controller. Just wiggle the stick around or rotate the button with your thumb while pressing it. You know you used to do that! Read the rest of this entry »
7 Comments | C64 Hardware, Other Retro Hardware | Tagged: Amiga, C64 hardware, game controllers, olg gear maintenance, Repairs, retrocomputing, retrogaming | Permalink
Posted by ilesj
January 25, 2012

I wanted to be able to hook up an Amiga 500 to TV with decent picture quality for an upcoming gaming session. Instead of using the lousy composhite signal or the dreadful RF antenna cable I wanted something much better because modern TVs don’t forgive low-quality video signal. In fact, flat panel TVs tend to make old systems look really bad. Low resolution and sharp, pixelled graphics (in contrary to e.g. real life video) transferred using blurry and noisy signal, and then displayed stretched and processed on a HD panel. You know it ain’t gonna be pretty! The best way to prevent the worst eyesores is to use high quality video signal at least.
So, off to make a RGB SCART cable for that Amiga. Read the rest of this entry »
29 Comments | Other Retro Hardware | Tagged: A/V, Amiga, DIY, Repairs, retrocomputing, RGB video | Permalink
Posted by ilesj
January 8, 2012
 This is my C64 tower. It has been built nearly 12 years ago by me and a friend of mine. It has seen it’s best days long time ago, but now I’m about to make it better than it ever was.
Built into the old IBM case is a C64E motherboard (the new, short board) from a late C64 C and a much older 1541 disk drive. Basically the machine is an original hardware setup – including the original power supplies. The C64 motherboard is mounted horizontally at he bottom of the case. The C64 PSU is attached to the flank of the case – not very discreet I know. The drive mechanics of the bulky 1541 drive fit perfectly to one of the 5 1/4″ drive bays. The motherboard (or logic board) and transformer have been relocated around the mechanics.
An external power cord plugs into the rear of the machine. The mains voltage is routed to the original transformers trough a two-stage switch and fuses. The two stage switch makes it possible to power the C64 without starting up the disk drive and also to switch off the 1541 while C64 remains on.
The obvious issue of keyboard was also solved in a rather straightforward manner. The keyboard ribbon was simply cut, and then wired to the PC’s serial port connector at the back of the machine. An extension cable for the keyboard was done from old printer cable, which then plugs into the port. Not pretty but does its job!


The other necessary connectors were also routed to the back of the machine. A composite video, dual mono audio and RF antenna connections were routed to the added back plate of the machine using RCA plugs. The transparent back plate is in place of the missing PC PSU. Joystick ports are available at the bottom, as the motherboard barely fits inside the case.
The C64 and 1541 use the case’s power and HDD LEDs as their power LEDs. The power button of the case acts as a reset button for the C64. Read the rest of this entry »
7 Comments | C64 Hardware, Commodore 64, Projects | Tagged: C64 hardware, C64 KERNAL, C64 repair, C64 Tower, retrocomputing | Permalink
Posted by ilesj
February 13, 2011

New hardware for the C64 appears like it was still a production machine. It’s amazing. This time I’m talking about EasyFlash cartridge. EasyFlash has existed for some time already, and now I got myself one of those.
I bought mine fully assembled from Mike Betz via Lemon64 Forums. These carts are nicely finished with quality case, stickers and all. And of course I peeked inside – the case hides the real quality of the cartridge; Professionally made PCB, all socketed chips and flawless soldering make up these EasyFlash cartridges.
So what’s EasyFlash?
EasyFlash is a Flash memory based programmable cartridge for C64. Basically it works like any original game or software cartridge except that the cartridge binary (data, or cartridge image) can be easily erased and rewritten. And this is done using no other tools than the C64 and software called EasyProg. Any standard (8k & 16k) or Ocean Type 1 (128k & 256k) cartridge image can be written into EasyFlash and it effectively “becomes” that cartridge. Read the rest of this entry »
6 Comments | C64 Hardware, C64 Software, Commodore 64 | Tagged: 8-bit, C64, C64 cartridges, EasyFlash, retrocomputing, sd2iec, uIEC | Permalink
Posted by ilesj
October 4, 2010
It’s been already a while since I got the uIEC – one of the available hardware running the sd2iec firmware. I did some experimenting with it on how to make the best use of it if the nicely accompanying JiffyDOS is not present. I posted my experiences at Lemon64 forums, but I thought it would be nice to share them here as well. Still, you might want to read that instead for shorter, less detailed description.
Note that I’m describing sd2iec-firmware being used on uIEC/SD-hardware with Commodore 64. Many different hardware combinations are possible.
The principle
With sd2iec loading files from the SD card’s root folder is like loading files from a floppy disk. The very basic loading procedure is exactly the same – except that the default device number is not 8 but 10. So LOAD”$”,10 or LOAD”GAME”,10,1 works just like one would expect.
Things get more complicated if you want anything more. Something like to enter a directory on the SD card or to mount a .d64 disk image. A real Commodore disk drive wasn’t designed for such things so you don’t even have the commands for something like that. Since uIEC is connected only to the serial port of C64 it can be interfaced only using the IEC bus. Enter the command channel! Everything like directory navigation, disk image mounting and device configuration is done by sending drive commands over the command channel. Read the rest of this entry »
26 Comments | C64 Software, Commodore 64 | Tagged: 8-bit, C64, JiffyDOS, retrocomputing, sd2iec, uIEC | Permalink
Posted by ilesj
July 19, 2010

Few days ago I got myself a uIEC/SD ordered from Jim Brain. I also bought a set of JiffyDOSes which should make a perfect match with uIEC. Even though I am a happy 1541 Ultimate user I wanted to get familiar with this device as it and other SD memory card applications using the same sd2iec firmware seems to be very popular. Also, this one can be nicely used in Commodore machines where the C64 Expansion port is not available. Read the rest of this entry »
6 Comments | C64 Hardware, Commodore 64 | Tagged: 8-bit, C64, C64 hardware, C64 KERNAL, Commodore, JiffyDOS, retrocomputing, sd2iec, uIEC | Permalink
Posted by ilesj


