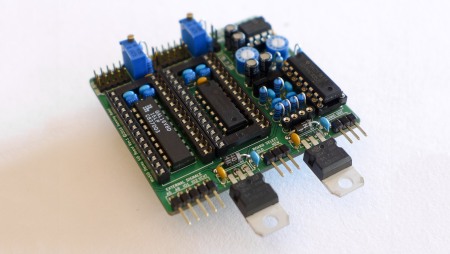
While me and couple of hundred other SID fanatics are waiting for the SIDFX units to arrive, a new advanced dual SID board design appeared out of the blue; MixSID by Henning Bekel.
The arrival of MixSID is quite interesting, as feature-wise MixSID appears to be on-par with the SIDFX. Want to install any two SID models to any C64 model? Be able to switch between the installed SIDs on the fly? Choose between mono, dual-mono or true stereo operating modes? Have flexible selection for the second SID address space? Adjustable digi-boost for 8580? Volume level balancing for the installed chips? Reduced noise?
Check.
Both SIDFX and MixSID are capable with the above, and more. Of course SIDFX has even more some interesting features, including software configuration for the settings, and automatic configuration (voltage, filters) for the installed chips etc.
Comparing the two is not exactly the point of this article, but I can’t help myself doing that spec-wise, as both are advanced dual SID boards, with many similar features, and appearing around the same time.
The biggest difference between the two is actually the approach and design philosophy; SIDFX states being a plug and play, solder free solution that automatically detects the installed SID chips and configures itself accordingly. MixSID, in turn, is manually configured, comprehensively documented, open source, and DIY-friendly.
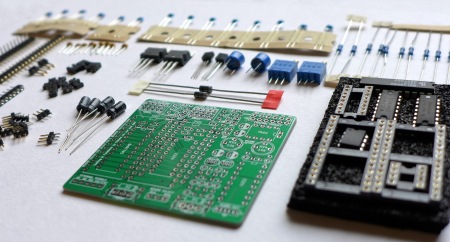
In fact, you can only have MixSID by building one yourself. You can go ahead and order or make your own pcbs, but Henning also sells the MixSID boards as kits, and I was sure to get myself one.
Before taking a look on the kit itself, let’s take a moment to admire the outstanding documentation provided by Henning: MixSID project page. All you really need to know is there. The step-by-step assembling instructions and interactive configuration tool are especially respectable.
Assembly
Assembling the board should not be an issue for anyone who has experience in soldering through-hole electronics. There are quite many components, with few of them having a narrow raster, and all components are tightly packed. So accuracy and tidy soldering is required. The step-by-step instructions provided on the web page are a great help. If you just follow the instructions and work with care, it’s difficult to get it wrong.
Some additional building tips, though these have been added to the building instructions since.
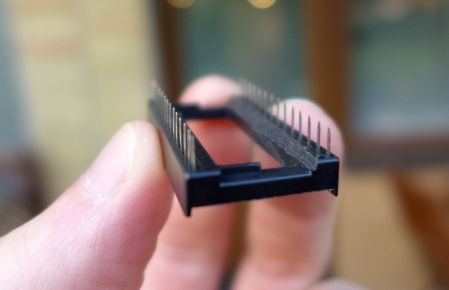
If you order the kit from Henning, the ICs and sockets comes inserted into plastic foam to protect the pins. I would recommend anyone assembling the kit to cut a piece of that foam to protect the pin headers once those and the sockets have been soldered. It’s very easy to accidentally bend the thin precision pin headers while working on the board. These thin precision pins cannot withstand much bending back and forth until they break.
I used traditional leaf spring sockets for the SID chips instead of the machine pin header sockets that came with the kit. I like this kind of sockets better, because I think they are more suitable for swapping the chips every now and then. With the socket type I had, socket #1 required some extra dremeling to fit nicely.
Word about soldering the voltage regulators. I bent the regulator legs to 90 degrees angle with pliers prior to soldering. It wasn’t a good idea. Doing that resulted in that the regulator legs were laying flat on the pcb surface. The external voltage line runs below the bent-down regulator legs. This means that if VEXT is used, there is only the pcb coating isolating the +20 V or so from short circuit or the regulated voltages feeding the installed SID chips. So having a small gap between the bent-down regulators and the pcb surface is a good precaution. I would advise soldering the regulators upright or to an angle, and bending them down afterwards. This should make sure that there will be a gap between the regulator legs and the pcb surface.
Using MixSID
The MixSID board needs to be configured according to the installed SID chips and the motherboard model it’s installed to. For setting all the jumpers correctly, there is an excellent online configuration tool. There are many jumpers to set, so care needs to be taken.
The “runtime controls” featured in MixSID means that the operation settings can be changed while the machine is on and music playing. Switching for example between real stereo mode (music made for two SID chips, six SID voices, stereo), dual mono (both SIDs play the same music, but on different channels) or normal mono (only one SID can be heard on both channels) is done using these runtime controls. In practice these runtime controls are logic signals that can be controlled with on board jumpers, switches or some kind of a micro controller.
For testing this board, I simply used jumpers on the board for now. With closed C64 case this wouldn’t be very convenient, so a set of switches could be connected here. Henning also has a very elegant solution for controlling MixSID: keyman64. Got this kit too, but I haven’t had the time to play around with it yet.
The integrated mixer on the MixSID is a great feature, also controlled with the runtime controls. You can select which SID is on left and which on right channel in stereo mode for example. Having the mixer on board is actually more interesting with ordinary 3-voice mono tunes. Setting the two chips as left and right channel makes the sound rich and lively in a unique way. But even with this possibility you might want to listen just one SID at a time, on both channels, and switch the playing SID on the fly. It’s most interesting to be able to switch between the installed SID chips while they are playing, making it easy to compare any two SIDs in the exact same running environment.
Being able to switch between the installed chips like this also makes setting the volume level of both chips the same a piece of cake using the on-board volume potentiometers.
When in stereo mode, the MixSID board automatically uses the right address for the second SID chip. So the user doesn’t have to select in which address the added SID chip resides, all that is needed is to set MixSID into stereo mode.
Power
SID chips’ running voltages are always a topic. MixSID handles the power in a straight-forward way; It takes +12V for 6581 chips from the SID socket if installed on a ‘long board’ model. If running on a short board model (C64 E, ASSY No. 250469) the MixSID board requires an external voltage source from the motherboard, for which a location is instructed in the documentation. This external voltage taken from C64’s power supply circuit is then regulated to +12V with the regulator found on MixSID board. The +12V voltage, no matter if coming from SID socket or from the on-board regulator, is then fed through +9V regulator to be used with 8580 chips. A configuration jumper sets which voltage is fed to each SID socket on MixSID board.
To summarize: Installed 6581 chips have the running voltage regulated by the +12V regulator found on C64 motherboard when installed on a long board C64. And when installed to a short board, the MixSID regulator provides the required +12V voltage. Installed 8580 chips have always the running voltage regulated by the MixSID +9V regulator.
The +9V regulator runs only warm, but the +12V regulator got quite hot, above 50 degrees Celsius, when I ran the board in C64 E, even with unrestricted airflow around the board.
Sound output
MixSID has identical on-board audio output for both installed chips. This is far more practical than using the original sound output for SID #1, and some other output route for SID #2 like it’s done in most earlier dual SID designs. It’s also possible to route the audio to the motherboard so that there is sound present in the mono only A/V port, or RF antenna signal.

I made a cable like this for the sound output for now. Cable from my broken Koss earplugs recycled for a good use!
What comes to the sound quality, at least background noise level is reduced, even without using the simple noise reduction option found on the board. I haven’t done analytic head to head comparisons using different C64 models or anything, so that’s all I can tell with certainty for now.
Some comparison and notes from practical point of view
SIDFX is not quite yet here, so let’s take the DualSID, which has been among the best available dual SID designs so far, as a reference point. Also, Henning mentions that MixSID design is based on modifications he has done on DualSID for himself.
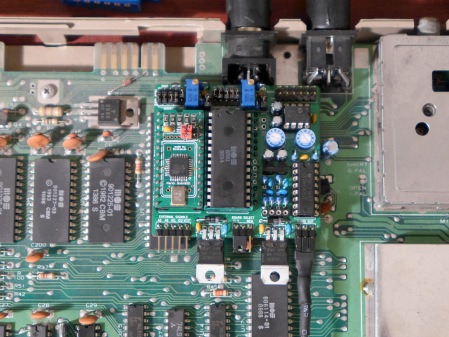
Naturally MixSID matches and exceeds the features of DualSID with the cost of being bigger and more complex to assemble. Still I wouldn’t call MixSID big, but it’s considerably bigger than the simpler and very compact DualSID. Despite the bigger size, there was no issues installing MixSID either to E board (ASSY 250469) nor B board (ASSY 250425). Especially with E board there’s good clearance to surrounding components. With B board the SID #2 hovers above the CPU, and the other regulator extends slightly over the PLA – both chips that some people like to heatsink.
A nice feature in the MixSID is that it uses the same pin arrangement for the extra address lines as DualSID. If you have a C64 board with a cable installed for these address lines like me, you can simply swap the MixSID in place of DualSID.
The dedicated audio output for both SIDs is a definite plus – one place to take the stereo output instead of routing the audio signals from different locations.
The vast configuration options brings unmatched versatility. It’s possible to install any two SID models in the arrangement you like. The board can be configured to meet just about any imaginable situation without touching the board itself as long as suitable SID models are installed. Choosing between traditional mono and different stereo modes is a breeze, and it can be done safely on the fly. Even if you are not interested in stereo hacks, this board lets you change between old and new SID with a flick of a switch.
It’s a great piece of kit. In case you missed the SIDFX preorder, MixSID is a great alternative. If assembling this kind of a DIY kit and taking responsibility in configuring it correctly by yourself is not a turn-off for you, I’m highly recommending MixSID as the dual SID design for any need.


Hi Ilkka!
Love all your SID posts. Thought you and your readers might be interested in our project if you haven’t heard about it already.
Chris Huelsbeck will be creating new music on the C64 SID for the first time in over 25 years! Please help us spread the word so we can make this once in a lifetime event happen for all the C64 community! :)
http://tinyurl.com/jka9pxk
Thanks!
Thanks! Unknown Realm seems like a very nice project. Really cool that you are making it for the real C64 too – I’m glad you have the project well funded on Kickstarter :)